Conductrics Markup
Conductrics offers a simple "Markup Approach" style of implementation, where you can add a few HTML attributes to your pages that "describe" what's different between the "A" and "B" (or whatever) versions that should be shown to your visitors.
It's designed for situations where it's easy to make a few additions to your page HTML on your side, but where a full programatic integration isn't needed. The aim to keep things simple if you either hand-code their pages in HTML, or use a CMS that can be lightly customized to add a few additional attributes when generating the HTML for your pages.
Which Implementation Option?The "Markup" option described here is one way to work with Conductrics, but there are others:
- If you want to set up changes "visually", use Conductrics Express, especially if you don't want to (or can't) make changes in your actual page HTML for each agent or test.
- If you can easily add some simple attributes to your page's HTML on your side (perhaps via a CMS), but don't want or need full programmatic control as a developer, consider using Express Markup as described here.
- If you want full control as a developer, use the Conductrics API, either via JavaScript or as a Web Service.
Getting Set Up
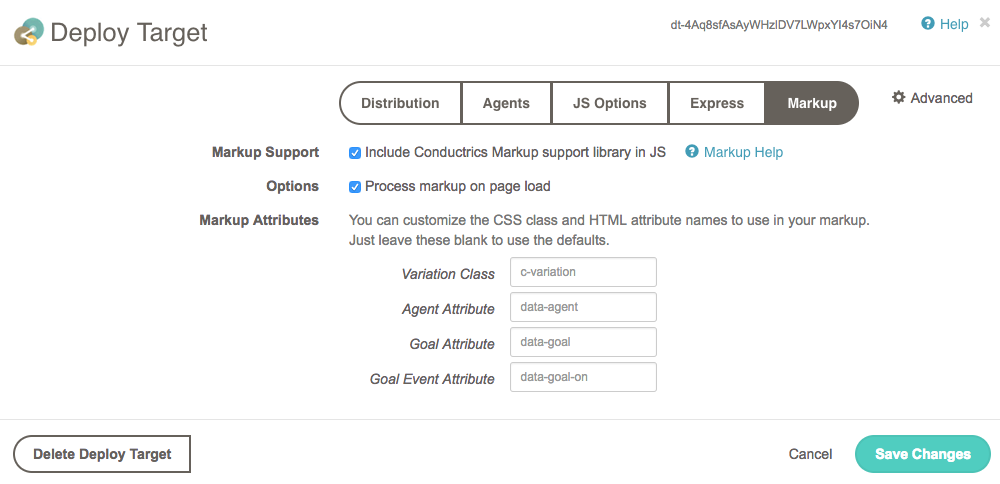
First, you'll want to enable Conductrics Markup for your site or project.
- Go to Settings > Distribution and hit Edit for your JavaScript Deploy Target.
- On the Markup tab, check the "Include Conductrics Markup" option. You can leave the other options alone for now - we'll discuss them in a later section below.
- Hit Save Changes to finish.
Next, add the Conductrics Markup support to your site:
- Required: If you haven't already, add the main Conductrics
<script>tag to your pages, preferably in the<head>or near the top of the<body>. You can get the tag to add from the JS Options tab for your deploy target. - Optional, but recommended: Add the "Markup Fallback Snippet" shown below to your pages, again preferably in the
<head>or near the top of the<body>.
The purpose of the fallback snippet is to control flicker and provide fallback handling in case anything goes wrong. Even if you don't or can't put the main Conductrics script in the head or near the top, please consider adding the fallback script as early as possible. See the [#fallback-handling](Fallback Handling) section below for details.
<!-- BEGIN Conductrics Markup prehide/fallback handling -->
<style id="c-ms">
html.c-m-js:not(.c-m-fallback) .c-variation:not(.c-variation-block),html.c-m-js.c-m-done .c-variation,html.c-m-fallback .c-variation:not(.c-default) {display:none !important;}
html.c-m-js:not(.c-m-fallback):not(.c-m-done) .c-variation.c-variation-block {visibility: hidden !important;}
</style>
<script>document.documentElement.className+=' c-m-js'; setTimeout(function(){(document.documentElement.className.indexOf('c-m-done')>=0)||(document.documentElement.className+=' c-m-fallback')}, 2000);</script>
<noscript><style>.c-variation:not(.c-default) {display:none !important;}</style></noscript>
<!-- END Conductrics Markup prehide/fallback handling -->This version of the snippet is intended to work well for most sites, but it can be adjusted as needed. Please feel free to discuss with Conductrics.
If possible, we recommend that the code snippet shown above be added to your pages directly, rather than via a third-party tag manager. That way you'll get the fallback logic even if the tag manager itself can't do its job (perhaps because the visitor is using an ad blocker, etc).
That should do it in terms of the setup. Now you can move on to adding the markup for an actual test or optimization.
Showing/Hiding Content with Conductrics Markup
Once you've enabled the markup support as discussed above, you are ready to actually add the appropriate markup to your pages.
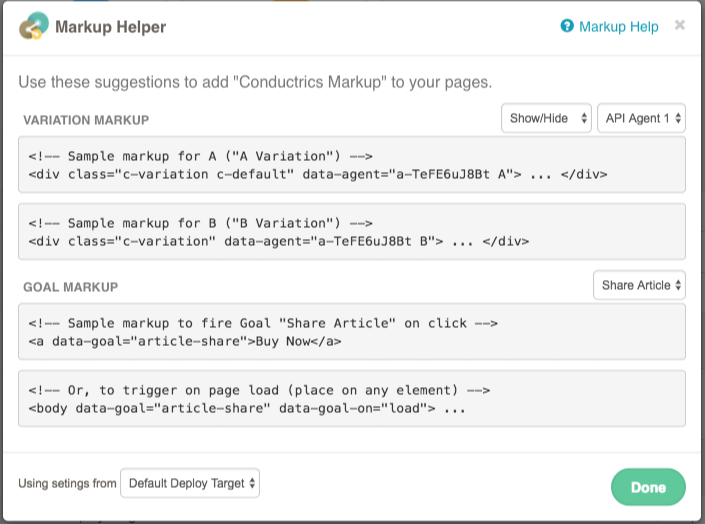
- Create a new API Agent. You can do this from the Agent List page in the Conductrics Admin.
- From the agent's page in the admin, hit the Markup button (near the bottom of the page).
- Copy the sample Variation Markup into your own page(s), adapting it as appropriate to display the variations you have in mind. Where exactly you copy the markup to will depend on what you're trying to achieve in your pages. You are essentially marking certain portions of your pages as being "swappable" conceptually, shown or hidden for each visitor depending on the variations selected by your Conductrics agent.
- Copy one of the sample Goal Markup snippets into your own page, also adapting it as appropriate to trigger your goals if the user clicks a desired button, etc.
Example Scenario
As a simple example, let's consider a scenario where you want to test two different versions of headline text against one another. So let's say your page's current HTML contains a basic <h2> tag like so:
<h2>My Headline</h2>
Let's assume you want to try changing the headline text. Using the example markup provided by the "Markup Helper", you might adapt the original <h2> tag as follows:
<h2 class="c-variation c-default" data-agent="a-e0AQrvMbK0 A">My Headline</h2>
<h2 class="c-variation" data-agent="a-e0AQrvMbK0 B">My Alternate Headline</h2>
When an actual visitor comes to your page, both options will be hidden initially (because of the c-variation class. The Conductrics Markup library will then get a selection from the agent and reveal the corresponding page element.
Multiple changes for a given variation?If your scenario calls for changing multiple areas on the page for each variation, just repeat the basic process as needed. Any number of elements can be marked as "A", indicating that they should be shown for visitors that get selected for the "A" experience, and so on.
You shouldn't see any flicker or lagIf the CSS class and script tag have been placed correctly (as discussed earlier in this page), this showing and hiding should happen nearly instantly, with no "flicker" or "lag". This is because the variation selection is happening locally in the browser.
The variation marked with
c-defaultwill be shown for visitors that disable JavaScript, or if Conductrics can't load successfully, etc. See the Fallback Handling section below for details.
Adjusting Variation Display During Initial Load
When using Conductrics Markup, your variation content areas are "pre-hidden" so that there is no momentary "flicker" of the "other" variation(s) while the page is first loading. Usually this pre-hiding only occurs for a very brief moment (if at all), and even when it is perceivable it generally feels like a natural part of the page-loading process.
By default, this pre-hiding is done via the CSS display:none property. This means that the content areas are "collapsed", meaning that they do not take up room in the page during the moment(s) that they are "pre-hidden". In most cases this results in a smooth, sensible page-loading experience.
But you may have situations where it would be better if the variation content area was not "collapsed", so that the amount of space that will be momentarily taken up by whichever variation is selected remains "reserved" in the page layout. Usually this would be a scenario where the variations are being displayed near the top of your page ("above the fold") and are all the same size. Variations of "banners" would be a good example.
To do so, add the c-variation-block class to the default variation element (that is, the one that you have also marked with c-variation and c-default).
So, instead of:
<div class="c-variation c-default" data-agent="my-agent-code A">
You might use:
<div id="a" class="c-variation c-variation-block c-default" data-agent="my-agent-code A">
If the variations might be of different sizes when actually displayed in the page (for instance, if you are testing different headlines, and the headline variations might take up differing amounts of room on the page because some are longer-worded than others), you probably don't want to use the
c-variation-blockapproach.
Some Details about the Fallback Handling
The "fallback snippet" provided earlier strives to provide simple but effective fallback and handling, so that your pages are still usable when the normal Markup processing can't happen.
The fallback scenarios are as follows:
- No agent selection. If you've marked up some element(s) with
data-agent, but the markup processor doesn't get a selection from the corresponding Conductrics agent, then the markup processor will use the first variation for the given agent code in your markup. So, if the agent no longer exists, or hasn't been deployed yet, or has a rule which excludes certain visitors, etc., the assumption is that the first variation (as it appears in your HTML) should be shown. - Conductrics can't load/run. In a case where the main Conductrics script hasn't been loaded or has failed to successfully run after 2 seconds, then the fallback snippet will kick in and show the default variations (that is, the ones marked with
.c-default). This covers cases where an error occurs during normal Conductrics processing, or if the main Conductrics script hasn't loaded because of a network problem or your tag manager being blocked by an ad blocker, etc. - JavaScript disabled. Visitors that have disabled JavaScript in their browser will get the default variations (that is, the ones marked with
c-default).
Please contact Conductrics if you have any questions about the fallback handling, or questions about implementing Markup in general! :)
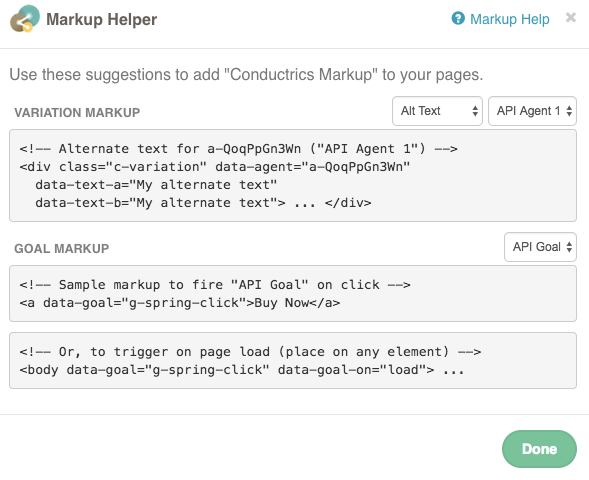
Alternate Syntax for Simple Text Substitutions
In some situations you may find it more convenient or appropriate to supply alternate text as attributes of the original element, rather than creating separate elements for each variation.
Provide the text in an attribute that starts with data-text- followed by the appropriate variation code, in lowercase. For example, if you want to provide alternate text for the B variation, you would use data-text-b, like so:
<h2 class="c-variation" data-agent="a-e0AQrvMbK0" data-text-b="My Alternate Headline">My Headline</h2>
The Markup Helper in the admin can help you get started, just choose Alt Text at top right:
You can only provide plain text content with this
data-textstyle syntax. If you were to include HTML tags, they would be displayed literally rather than being interpreted as HTML. See the "Alternate Syntax for HTML Fragment Substitutions" below if you need HTML support.
Alternate Syntax for HTML Fragment Substitutions
Similarly, in some situations you may find it more convenient or appropriate to supply alternate text or HTML fragments elsewhere in the document. You can use an alternate data-frag syntax for such situations.
First, create an invisible element to hold your alternate content and give it a unique id. We suggest using a