Conductrics Edge Setup for Akamai
Setting Up an Example Akamai Property
You might want to create a separate "example" or "testbed" type property in your Akamai account to do your initial evaluation of Conductrics Edge.
- Log into your Akamai Control Center dashboard.
- Click the Create button in the top navigation, then click Property.
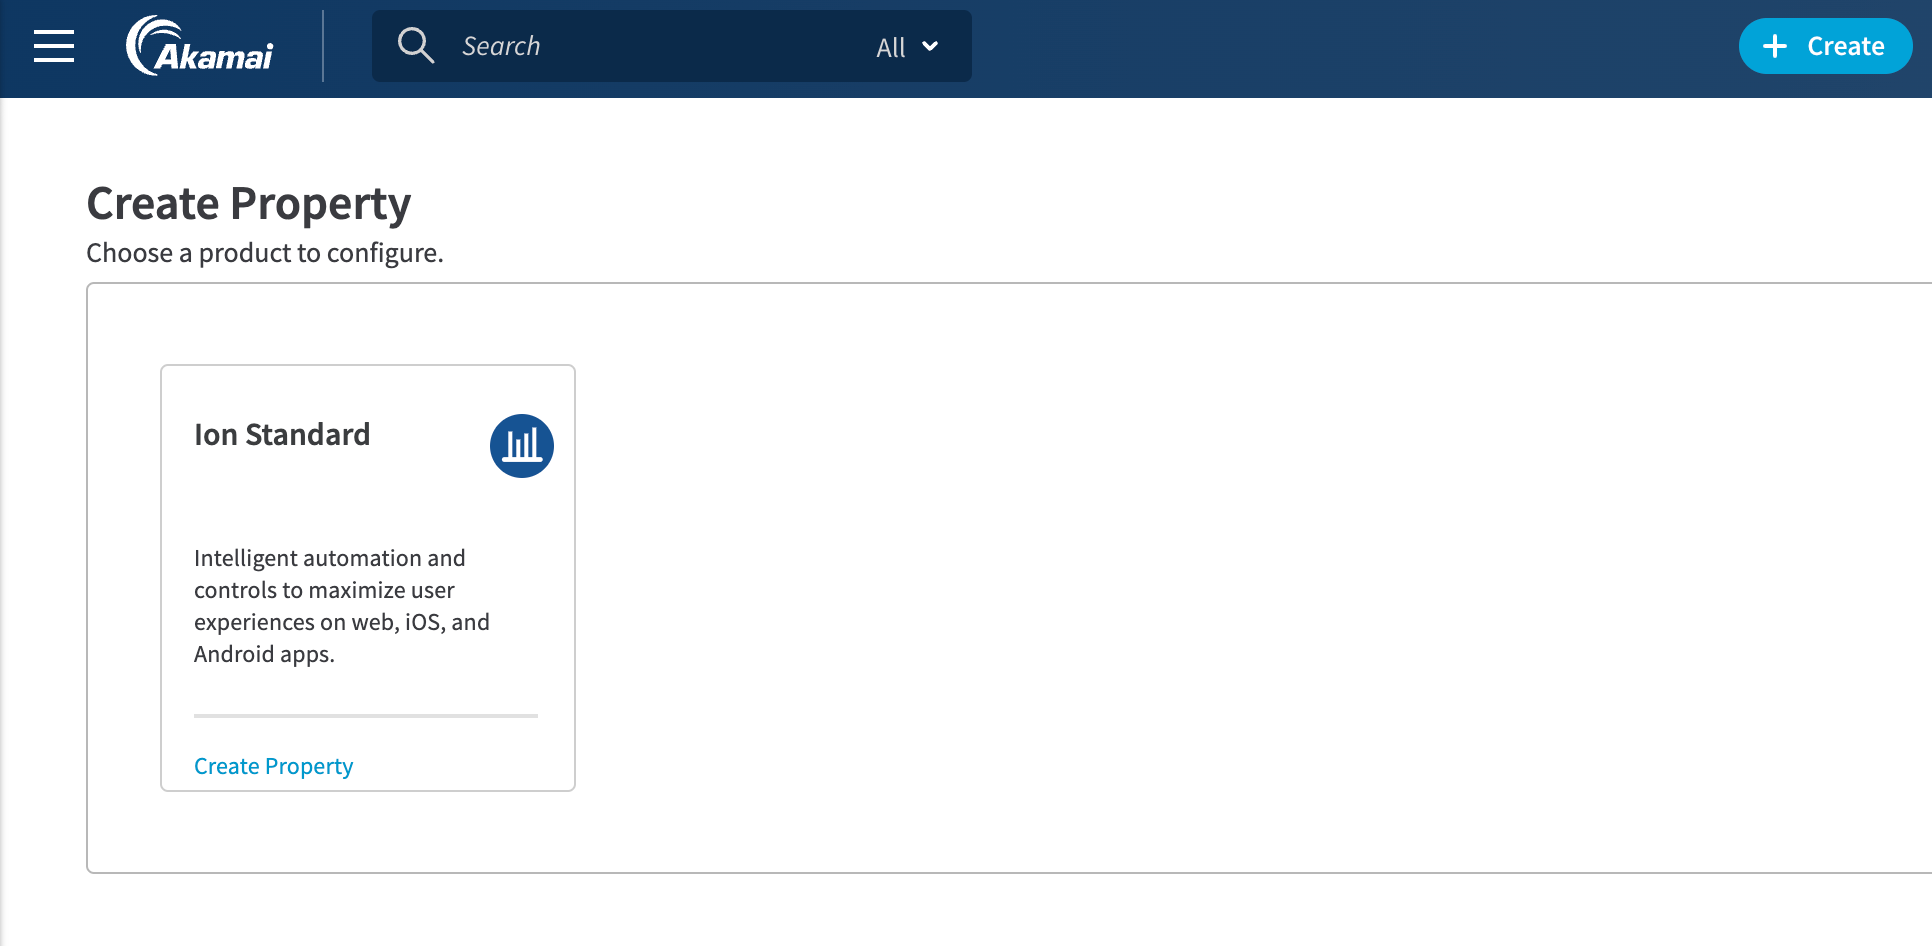
- Click Create Property under Ion Standard (or whatever Ion tier you have access to), as shown below:
You don't have to set up an Example Property. If you already have an existing Property in Akamai that you want to use Conductrics Edge with, you can use that Property instead.
Now click Guide Me for Akamai's guided setup process (or you can go straight to the Property Manager if you prefer).
The first bit of information you'll need to provide is the normal URL for the site that you want to try out Conductrics Edge with. You can use your company's normal website, a staging version of your company's website, or any other "example" website that you may have access to. Provide that URL as the public Hostname in the Akamai setup step shown below.
Please note that you will NOT need to fully activate the Akamai property yet. You can safely play around with Conductrics Edge before making the DNS changes that would expose the property to normal visitors on the Internet.

The remaining steps in the basic property-creation process aren't covered here, but are explained well in Akamai's documentation). You'll be guided through some choices about getting a SSL certificate (if applicable), and creating DNS records.
Create the PMUSER_CONDUCTRICS_VARY Property Variable
PMUSER_CONDUCTRICS_VARY Property VariableWhen using Conductrics Edge with Akamai, a Property Variable called PMUSER_CONDUCTRICS_VARY is required.
Please add the variable as shown in the screenshot below:
- Make sure that the name is exactly
PMUSER_CONDUCTRICS_VARYin ALL-CAPS, as shown below (note that the Akamai Admin adds thePMUSER_part for you). - For the Initial Value, please provide
ENABLEin ALL-CAPS. The Conductrics EdgeWorker will check for this value when it first starts running, and will abort processing if the initial value is anything butENABLE. - For the description, we suggest "Required for Conductrics Edge" or similar as a reminder about the purpose of the variable.
- For the Security Settings, please use Visible so that the Conductrics EdgeWorker can access it.

This Property Variable is RequiredWithout the
PMUSER_CONDUCTRICS_VARYProperty Variable, Conductrics won't be able to add the selected variations for each agent to the "cache key". This means that the Akamai CDN won't be "aware" of whether a visitor is assigned to Variation A or B for an edge-side A/B Test (or other edge-side agent).
Create an EdgeWorker Identifier
The main addition you'll be making to your Akamai Property is to add an EdgeWorkers bundle provided by Conductrics. The bundle includes the EdgeWorkers code that "powers" the Conductrics Edge functionality.
The first step is to create an EdgeWorkers identifier.
- In the Akamai Control Center, go to EdgeWorkers in the top-level navigation.
- Hit the Create EdgeWorker ID button to get to the form shown below.
- For Name, type Conductrics Edge or similar (the name is up to you).
- For Group, choose the appropriate group for billing purposes.
- For Resource Tier, choose Dynamic Compute.
- Click Create EdgeWorker ID to register the new ID.

About the Resource Tier OptionConductrics Edge may work with the Basic Compute tier in the future, but at this time Dynamic Compute is required. Please keep in mind that your Akamai account may be billed for your use of the Dynamic Compute tier, depending on your contract. Contact your Akamai representative for details.
See also: Creating an EdgeWorker ID in Akamai's documentation
Upload the EdgeWorkers Bundle from Conductrics
Next, we'll provide Akamai with the actual EdgeWorkers "bundle" that powers the Conductrics Edge functionality.
- To get the bundle from the Conductrics Admin, go to Settings > Deploy Targets, then click Setup for your Edge Deploy Target. See Conductrics Edge Setup if you don't have one already.
- Under the Express Edge tab, click the Download EdgeWorkers Bundle button, which should give you the bundle (a .tgz file). Save the bundle in some location on your computer so you can upload it to Akamai.
Now we can upload the bundle file to Akamai, as a new "version" of your EdgeWorker:
- In the Akamai Control Center, go to the EdgeWorkers section, and click on the EdgeWorker ID that you created above.
- Click the Create version button.
- Where it says "Drag and drop an EdgeWorkers code bundle, or click here to select one", provide the bundle file you got from the Conductrics Admin.
- Click Create Version to upload the file to Akamai.

See also: Create an EdgeWorker version
Would you prefer that Conductrics manages this part for you automatically? We would need API credentials from your Akamai account to do so. Let us know if you think that should be part of the capability.
Now you should Activate the EdgeWorker for Staging or Production, to make the EdgeWorker available for use:
- Click on the EdgeWorker Version that you created above.
- Click the Activate Version button.
- Choose Staging or Production as desired, then click Activate Version.

You probably want to activate in Staging first, unless you are using an example/demo property that you don't care about. See the Akamai Documentation about testing on Staging before going live in Production.
See also: Activate an EdgeWorker version in Akamai's documentation.
Add the EdgeWorkers Behavior to your Property
Now that the EdgeWorker itself has been created, it's time to attach it to your Akamai Property as an EdgeWorkers Behavior. All changes to Akamai properties are versioned, so you'll need to create a new version with the added behavior.
See also: Add the EdgeWorkers behavior in Akamai's documentation.
- In the Akamai Control Panel, go to CDN > Properties and click on the Property that you want to use Conductrics Edge with. The Property Details page should appear.
- Under Active Staging Version, click the New Version button to create a new version for Staging. (Alternatively, you could click New Version under Active Production Version if you you're working with an example/demo property just to experiment with - see the Akamai Docs for details).
- You should now be at the Property Manager Editor page for your Akamai Property Version.
- Click the Add Rule button (under Property Configuration Settings).

- In the Add New Rule window, select Blank Rule Template as shown below.
- Provide a name like Use Conductrics Edge or similar.
- Click Insert Rule.
Now provide some criteria to specify which pages you would like to use Conductrics Edge with at first. If you're just starting out, you might want to use a criteria that will only match some kind of test page, but it's up to you. You can use wildcards to match on various portions of your URLs and more. See the Akamai Docs for more information about how to match pages.
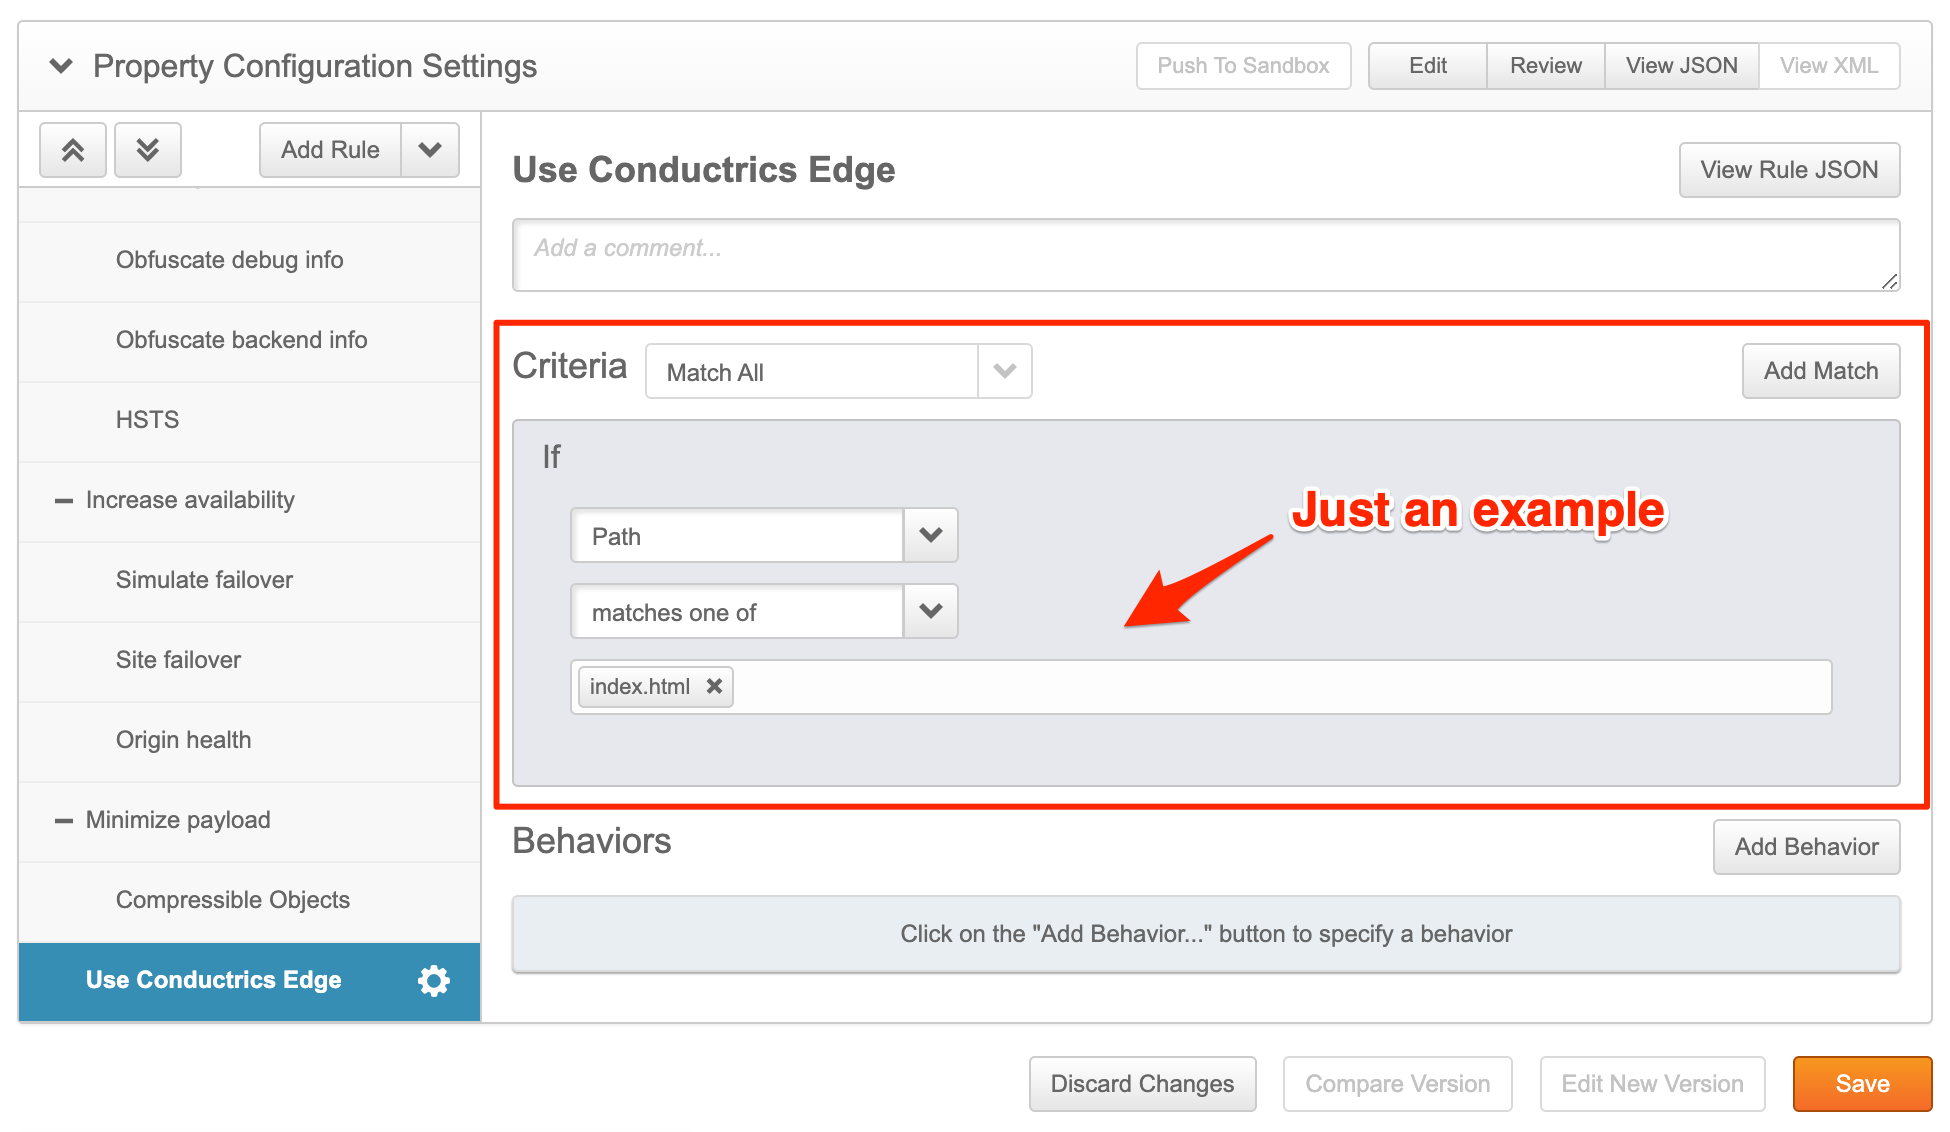
Depending on your Akamai contract, you could be billed for your EdgeWorkers usage. The criteria above can be used to not involve EdgeWorkers at all for pages that don't need it.
Next, we'll add the EdgeWorkers behavior to pass the request to the Conductrics Edge worker for the pages that match the rule criteria you provided above.
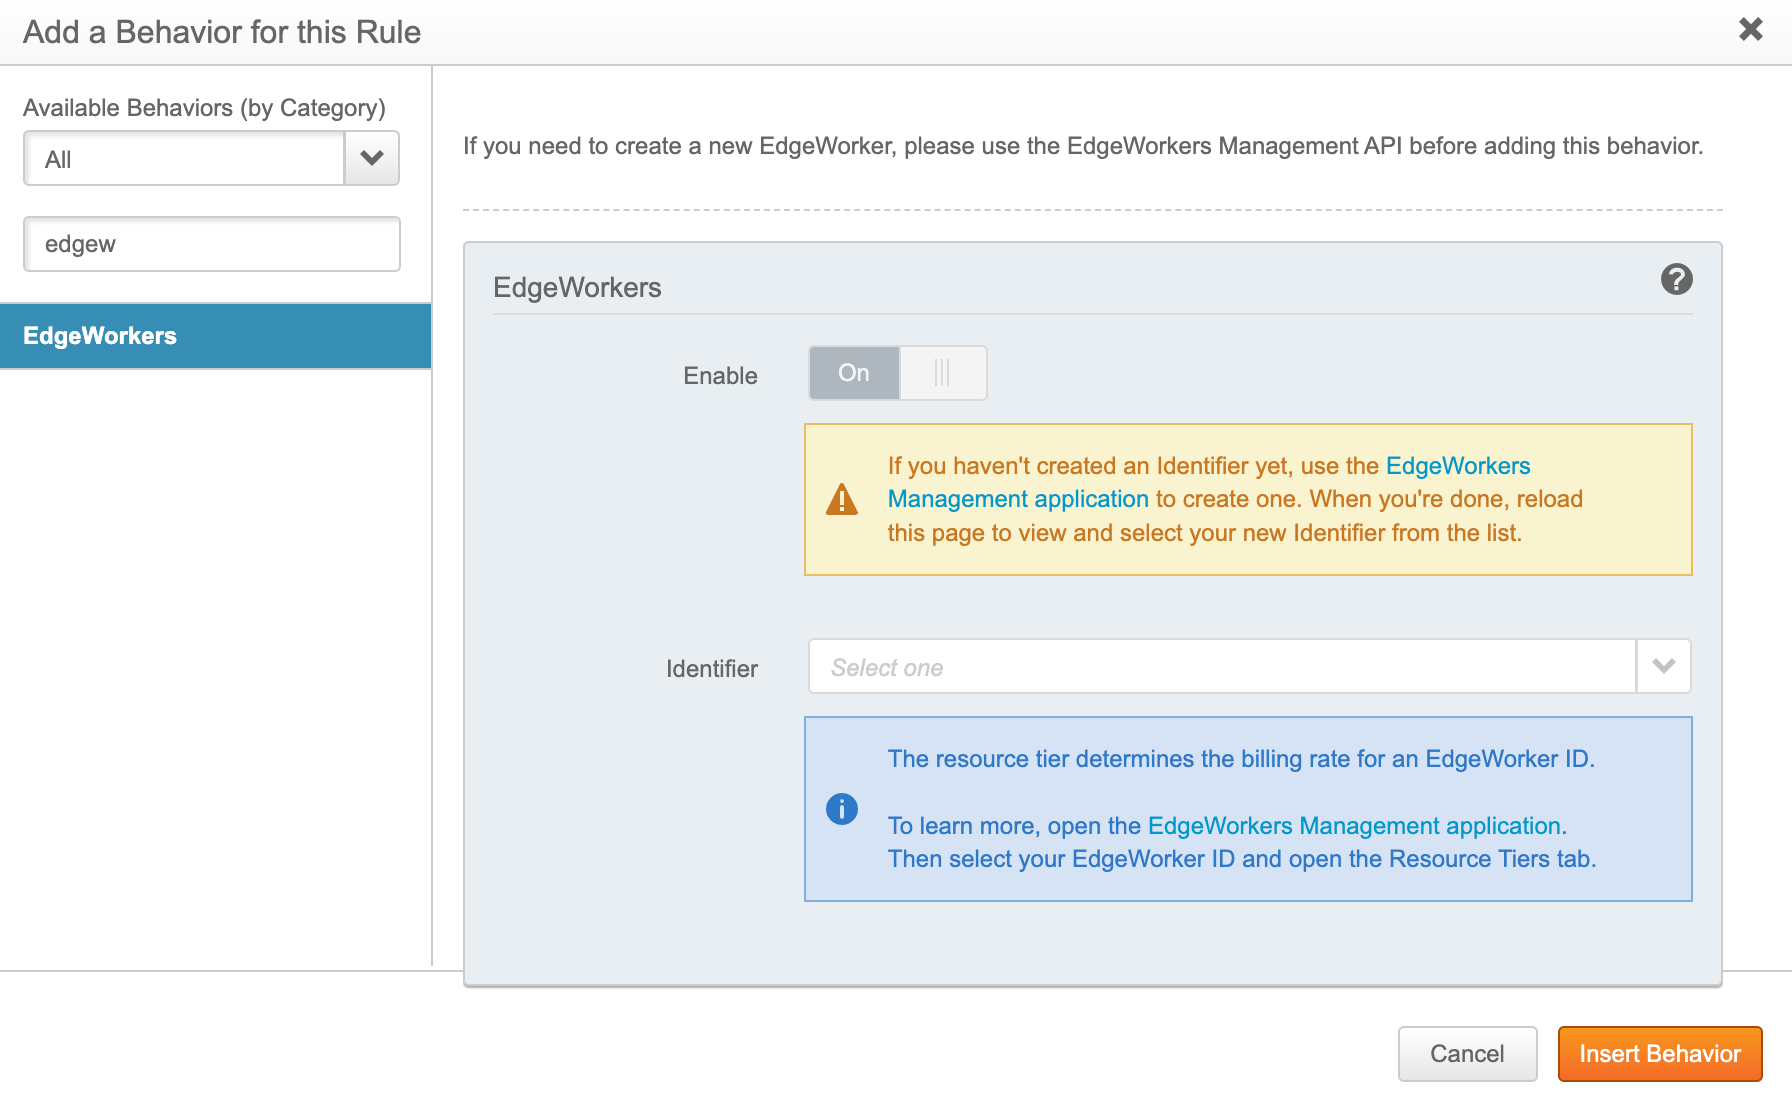
- Click the Add Behavior button (shown above).
- In the window that appears, search for the EdgeWorkers behavior as shown below.
- Click Insert Behavior (note that you won't be able to fill out the Identifier yet, which is normal).
Now you should be back at the Property Configuration Settings page, where you can finish adding your rule:
- Make sure that the Enable switch is On.
- Choose the EdgeWorker ID that you created earlier from the Identifier dropdown as shown below.
- Click Save to add the behavior rule to your Property. (Note that your new rule still won't affect your pages right away, because the property version that you're working on hasn't yet been deployed to Staging or Production.)

Note that the Enable switch shown above gives you a quick and easy way to enable/disable Conductrics Edge globally for your entire property from the Akamai side. Just flip the switch, save your changes, and then deploy to Staging or Production as needed.
Add a Conditional Origin (Optional)
If you would like to be able to set up variations in the Conductrics Admin (via WYSIWYG or Custom JS), you also need to to add a Conditional Origin rule to your Akamai Property. This will allow the EdgeWorkers portion of Conductrics Edge to communicate with your main Conductrics environment to "render" the changes called for, assuming that the visitor has been assigned to any variation(s) that use WYSIWYG or Custom JS to display the variations.
If you don't need the ability to set up the actual variation changes in the Conductrics Admin (via WYSIWYG or Custom JS), you can select the Allow Conductrics Edge to add headers and perform redirects only option for your Edge Deploy Target.
You can then skip setting up the Conditional Origin as described below.
To add the Conditional Origin:
- If your Akamai Property doesn't have one already, add a Conditional Origin Group rule as discussed in the Akamai Documentation.
- Next you'll be setting up a Conditional Origin Definition rule within the Conditional Origin Group. If you just added the Conditional Origin Group, you probably have an empty definition rule already within the group, so use that in the next step. If your property already had a Conditional Origin Group, then you may have an existing Conditional Origin Definition for some other purpose, in which case you should click Add Rule to add another Conditional Origin Definition to your group and use that new one.
- If you wish, provide "Used by the Conductrics EdgeWorker to "render" page variations set up via WYSIWYG or Custom JS in Conductrics" or similar for the optional comment.
- For the rule's criteria, match on Conditional Origin ID and provide
conductrics-edge-rendererfor the is defined as value, as shown below. - Continue below to fill out the Behavior portion of the form.

The Conditional Origin is only involved when Akamai needs to get the "Conductrics Rendered" version of a page to place in its cache (a "cache miss"). While the EdgeWorkers portion of Conductrics Edge is involved with every page request for every visitor (provided that the request matches the criteria for your EdgeWorkers Behavior Rule as discussed above), the Conditional Origin portion is only involved when there is a "cache miss".
See also Akamai's docs for more info about Conditional Origins.
Now you'll provide the Behavior portion of your Conditional Origin Definition rule.
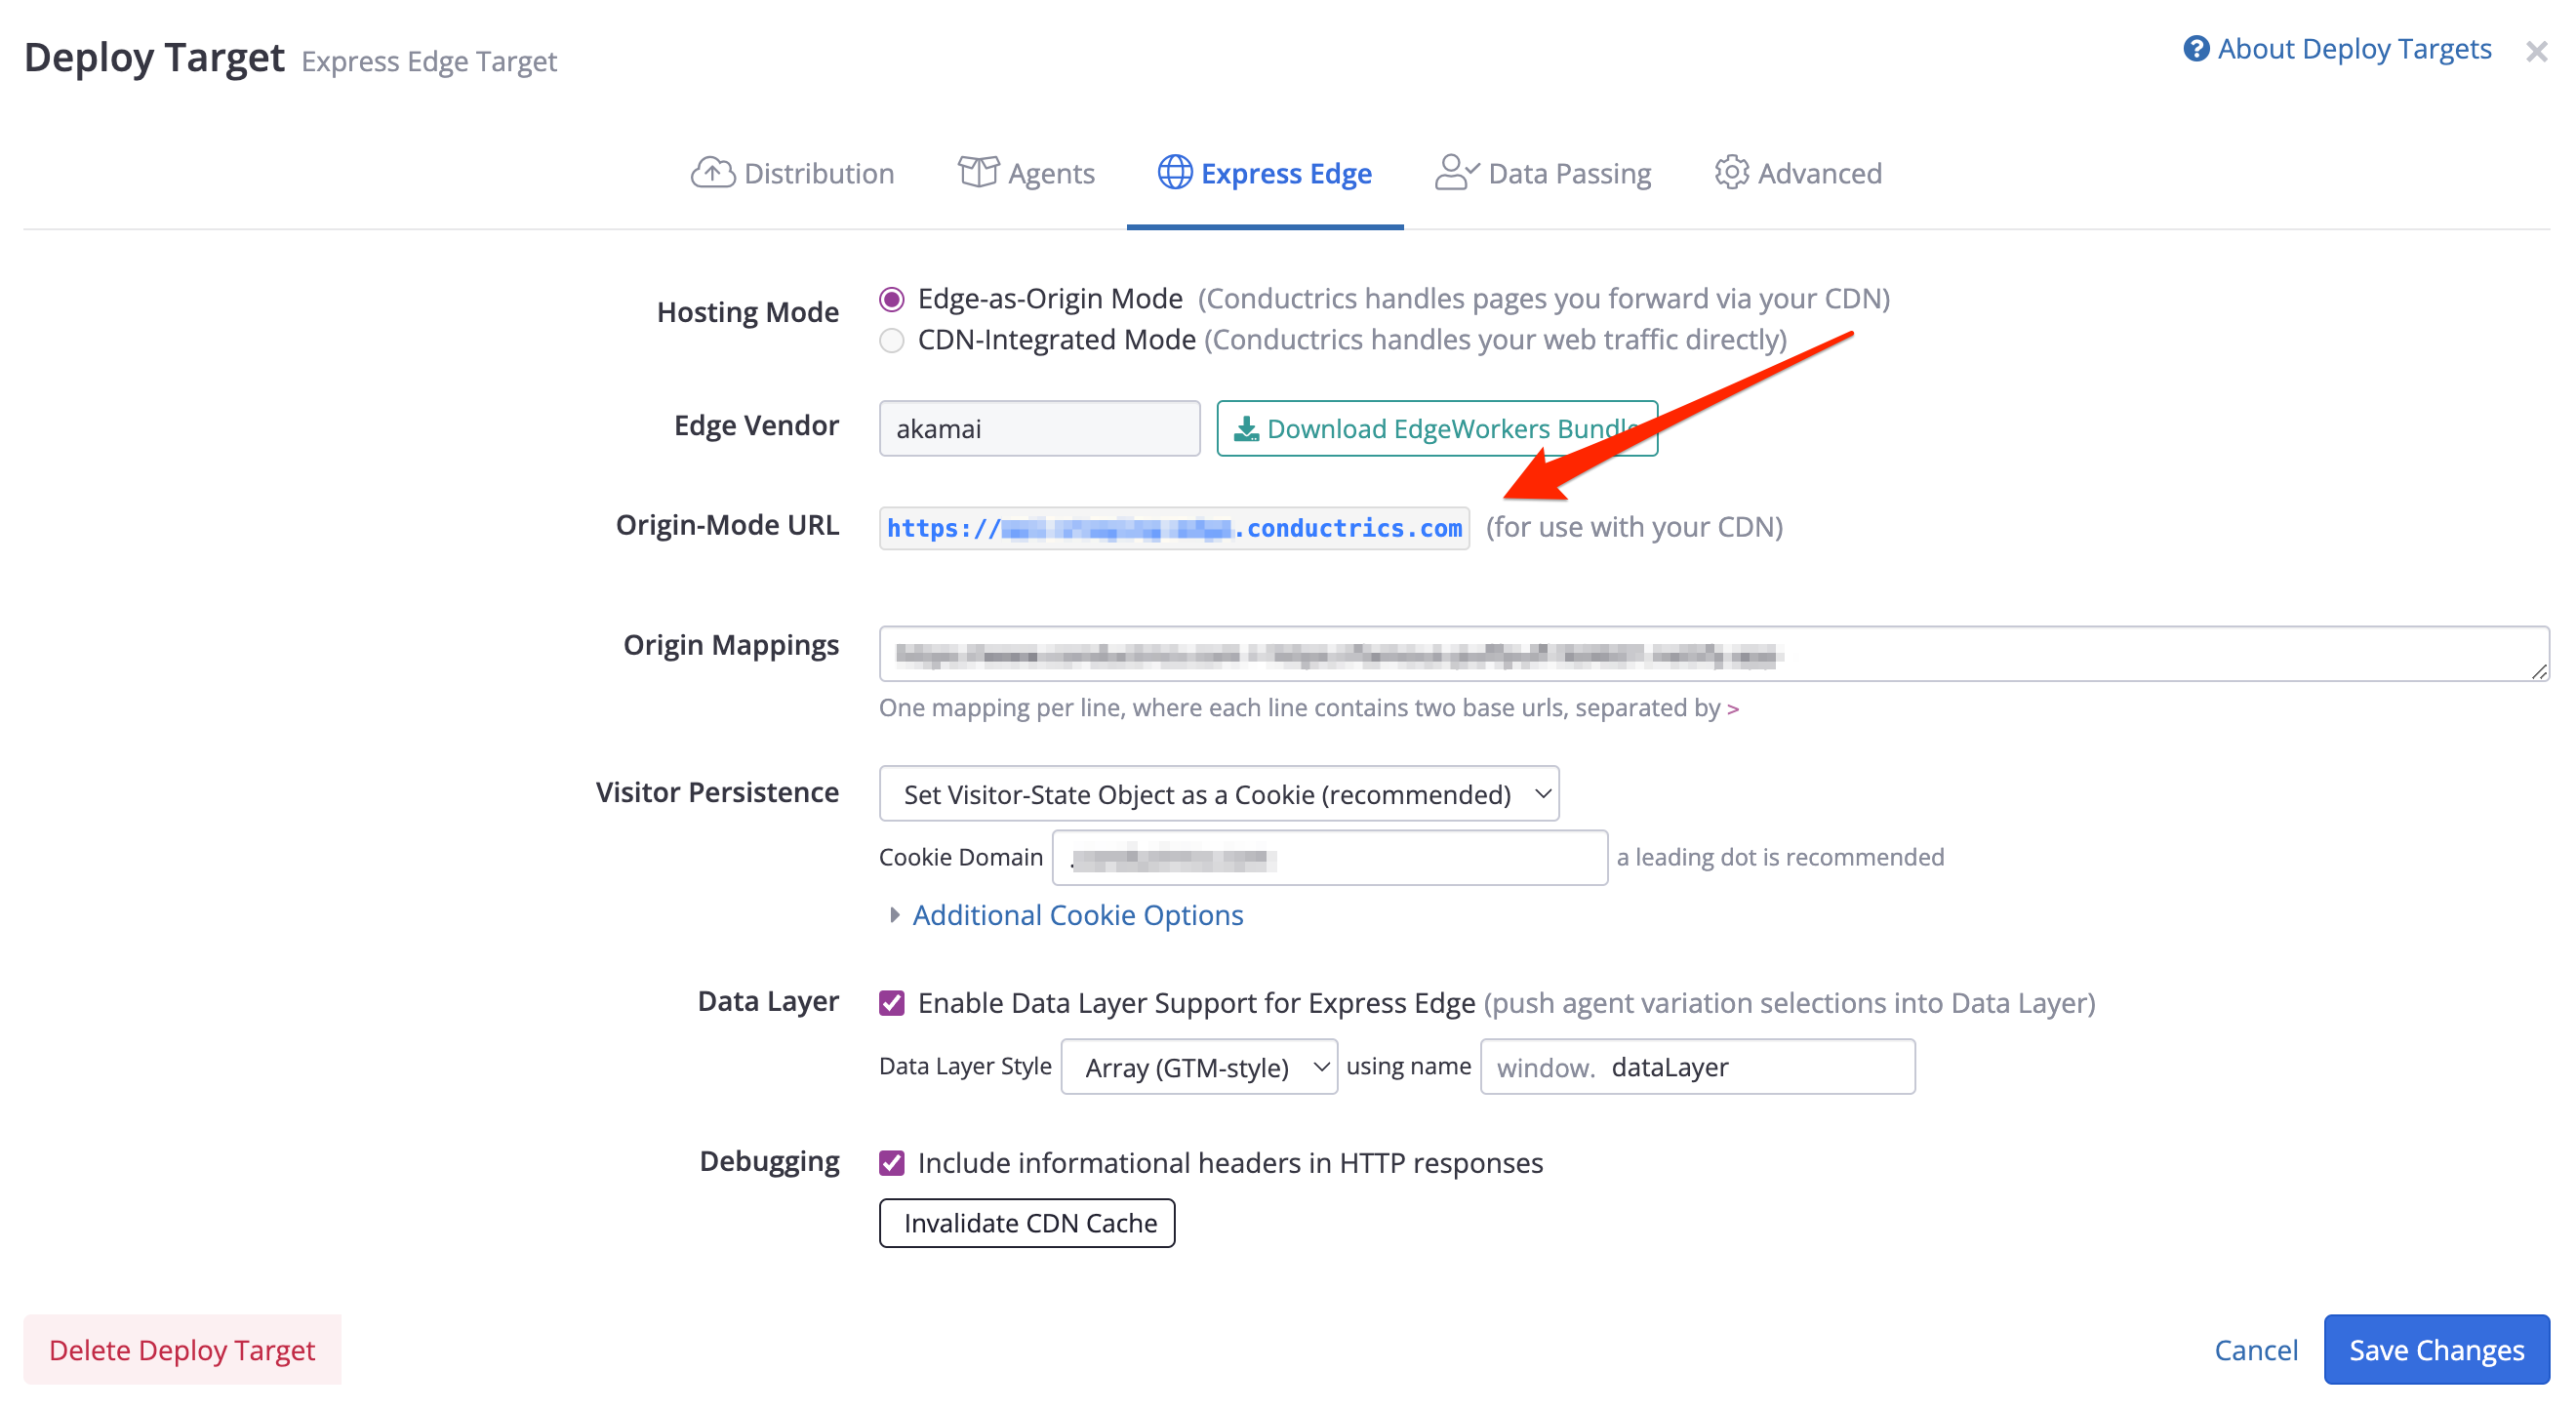
- For the Origin Server Hostname, provide the hostname portion of the Origin-Mode URL from the Conductrics Admin (see additional screenshot below this one). For instance, if the Origin-Mode URL shown in the Conductrics Admin shows
https://example.edge.conductrics.com, you'll provide that URL but without thehttps://part. - For Forward Host Header, choose Origin Hostname.
- For Cache Key Hostname, choose Incoming Host Header.
- For Supports Gzip Compression, choose No.
- For Content Provider Code near the bottom, you'll need to hit Create New and provide the same value that you provided for the Origin Server Hostname (from the Conductrics Admin).

Here's where you'll find the Origin-Mode URL in the Conductrics Admin, under Settings > Deploy Targets, then hitting Setup for your Conductrics Edge deploy target:
Troubleshooting Tools
Enabling via a Debug Key
Your Conductrics EdgeWorker provides handful of special debugging/troubleshooting behaviors, which you can use for debugging/testing purposes.
First, you need to establish a "Debug Key" for your Edge Deploy Target:
- Go to your Edge Deploy Target under Settings > Deploy Targets, then hit Advanced Settings under the Advanced tab.
- Add the Edge: Debug Key setting, and set it to a "secret" string value of your choosing. Think of this as a "password" for being able to do the "debugging stuff" discussed below. Like any "secret" key, you shouldn't share it outside of your organization.
- After saving the Edge: Debug Key setting, you will need to re-upload the EdgeWorkers code bundle to your Akamai property as discussed above.
Once you have re-deployed the EdgeWorker bundle to your Akamai property (in the Akamai Staging and/or Production network as appropriate), you can add it via the X-Conductrics-Debug header to get some additional logging (discussed next). You can also request certain special behaviors for debugging/testing purposes (see below).
Conductrics Debug Messages
You can view some debugging/log messages, which are similar to the messages printed to the JavaScript console when you've enabled Debug Messages for client-side Conductrics in the browser. To get the messages, you must add three special headers to your requests:
- A
Pragmarequest header which contains theakamai-x-ew-debugflag (it may also contain other flags as discussed under standard debug headers in the Akamai docs). - An
Akamai-EW-Tracerequest header, which contains an authentication token generated via theakamai edgeworkers authcommand. Note that you'll need to regenerate this token once it expires. See Enhanced Debug Headers in the Akamai docs for details. - An
X-Conductrics-Debugheader, set to the value of the "Debug Key" you established above.
GET https://www.example.com/index.html

Pragma: akamai-x-ew-debug
Akamai-EW-Trace: <your akamai authentication token>
X-Conductrics-Debug: <your conductrics debug key>
You should then be able to see log messages from Conductrics in the X-Akamai-EdgeWorker-onClientRequest-Log response header. See the Akamai documentation for details about this header.
Additional Diagnostic Headers
With the X-Conductrics-Debug header set, the Conductrics EdgeWorker will also emit a few additional diagnostic headers:
X-Conductrics-Debug-Info- contains various diagnostic counts, such as the number of times the EdgeWorker instance has been called, the number of times it aborted due to thePMUSER_CONDUCTRICS_VARYvariable being not set (see above), and the number of times it successfully or unsuccessfully loaded a "content refresh" (see next section).X-Conductrics-Debug-Last-Load- contains information about the last time the EdgeWorker instance tried to do a "content refresh" (see next section), which may have happened in a prior invocation of the EW instance.
Forcing a Content Refresh
Typically you will want your Conductrics EdgeWorkers to periodically poll for configuration changes ("phoning home") so that they automatically become aware of changes you've made on the Conductrics side. This way your EdgeWorkers will know if experiments have been newly started or stopped (or about any other changes to Goals, Traits, or other similar settings).
In normal usage, each EdgeWorker instance does this "refreshing" every few minutes, which you can control via the Refresh configuration from Conductrics every X minutes setting under the "Edge" tab for your Edge Deploy Target in the Conductrics Admin. If set to 2 minutes, each EdgeWorker instance will "phone home" the first time it processes a request, and again when processing a request if more than 2 minutes have passed since the last refresh.
Because the "refreshing" adds a bit of extra time to the processing, you can use a low value (such as 1 or 2 minutes) if you want changes to propagate to your EdgeWorkers very quickly, or you can use a bit higher of a value (such as 10 or 15 minutes) if you would rather prioritize making every request as fast as possible.
Assuming you are allowing the periodic refreshes (see callout below), you may want to be able to "force a refresh" during development and testing. Simulate a "content refresh" scenario by providing a X-Conductrics-Debug header, where the value is the "Debug Key" you created above, followed by force_refresh, like so:
X-Conductrics-Debug: my_debug_key force_refresh
Adjusting or Disabling Automatic Content RefreshesYou can adjust the refresh interval in the Conductrics admin, via the Refresh configuration from Conductrics every X minutes setting under the "Edge" tab for your Edge Deploy Target in the Conductrics Admin. You also can turn off the "phoning home" entirely by setting it to zero.
Note that you will need to re-upload a new version of the EdgeWorkers bundle in order for changes to take effect (such as an agent/experiment being newly started or stopped, etc), and the
force_refreshcommand shown above will have no effect.
Forcing a Wall Timeout
While we of course hope your experience with the Conductrics EdgeWorkers implementation is trouble-free, you may want to set up Site Failover in your Akamai Property so your pages continue to be served even if an error should occur within the EdgeWorker.
After adding Site Failover, you will probably want to test it to make sure the failover experience is correct. To that end you can simulate a "wall timeout" scenario by providing a X-Conductrics-Debug header, where the value is the "Debug Key" you created above, followed by force_timeout, like so:
X-Conductrics-Debug: my_debug_key force_timeout
This should cause the EdgeWorker to "never finish the request", very similar to the WallTimeoutError path in Akamai's Test Site Failover example.
Updated over 1 year ago